Friday, September 15, 2023

Hawk GT Progress and Paint Plans

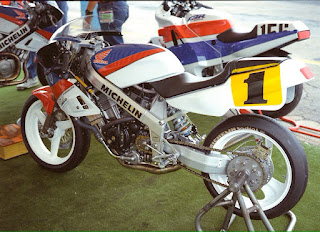
Well not a ton of progress progress but I did get the wheels powdercoated white and the new tires fitted along with the braided steel front brakeline, and had the bike safetied. The image above is the richly imagined future paintwork to be applied to the bike, looks like that will now be done over the winter. 

Since the bodywork will be sent to the painter "off the bike" it's up to me to tape out the areas that will get the different colours. This has to be done with the panels in situ because the painter won't know how they line up when on the bike. I want to avoid what happened to this poor guy and his Hawk.

So I applied the tape as shown above and applied the colours on MS Paint 3D... I think I need to tweak the upper line of the red on the fairing to make it *just* a little more parallel to the fairing bottom. That is, move the back edge of the red a little lower down towards horizontal. Other than that I think it looks pretty good. Decals have been ordered too.

Before I did this I took the bike out for a ride along my usual 50km route outside the city. As much as the bike needs to be caned around town to make progress (it is slow), it was great on the twisty backroads and easily attained 160km/h / 100mph indicated on the straights. Great machine and it'll look as well as it goes once I get this paintwork done.

Oh, and after I finished the tape work, as I rolled the bike off the paddock stand the sidestand dug in, retracted, and the bike tipped over. Fortunately the only damage was a banana'd clutch lever, now on the list to be replaced. Aaargh.

Monday, July 3, 2023

Mirrors for the Hawk GT

So my old Hawk GT's Two Brothers Racing fairing kit came with genuine Honda RC30 mirrors. These were "OK" but kinda chunky and clunky, so I swapped them for some smaller aftermarket mirrors. Problem was, when I got the new Hawk, I couldn't remember who made the old bike's mirrors.   

HawkGTForum.com to the rescue, as always, as a user identified the mirrors from a picture of my old bike. They are "F1" short-stem (40mm) mirrors from Bike-It. I ordered a pair from the UK on eBay.

They look good eh? Single-bolt so they are super easy to fit and stay very steady while the bike is in motion. Can't ask more than that of a mirror. So with those fitted I could actually put a temp tag on the machine and ride around a bit, bearing in mind the extreme old age of the tires...

Anyway, here's a few more shots of the machine...


 Next up I have to replace those ancient tires and refinish the wheels...

Friday, June 30, 2023

Look Who's Back!

I have to be honest, even with four bikes in the garage I miss my old Honda Hawk GT. I'd done a ton of mods on it to make it just how I wanted (TBR fairing kit, Racetech fork springs, 900RR shock, braided brake lines, etc.) and it was a lightweight, stylish bike that always turned heads.

Of course, I thought that buying my Ducati 900SS/SP made the Hawk GT excess to requirements. After all, as I wrote at the time, the Ducati did pretty much everything the Hawk did but with 35 more horsepower. But it turns out, it didn't really. The Ducati is a lot more serious than the Hawk GT, it's bigger, heavier, and more powerful. The turning radius sucks, and it's less reliable. In fact the latest garage addition, the 2003 Buell Firebolt XB9R, is a lot closer to the Hawk in spirit. It's also a V-twin and is pretty light and nimble. But I digress.

Not great looking

but you can see the potential

Anyway, I was talking to an old buddy who had a Hawk GT himself and idly inquired after whether he might be parting with it. In fact he was interesting in doing so as it hadn't moved under its own power for over 20 years, and he could use the garage space. So he fired it up (it's a Honda after all), gave it a once-over, offered it to me at a price that was reasonable, and I bought it and rode it home.

But as my late wife Pam would have said, while it was mechanically sound, it was also somewhat sad. My buddy the PO is an amazing engineer and he'd done some work to make the bike more comfortable for him, but that wasn't to my own taste. For example, one of the attractions for me was that the bike already had a Two Brothers Racing fairing kit, just like my old Hawk. But buddy had fitted high Telefix bars to soothe his bad back, and that required cutting up the fairing, and that required eliminating the top fairing bracket, and that meant the fairing wobbled all over the place when riding, plus it looked... odd. So the first task was sorting that out.

Thirty Yankee dollars got me a set of Chinese clip-on bars off eBay, and I bought some Honda-style grips like on my old Hawk. I'd never fitted clip-ons to a bike before myself, but after obtaining a 30mm socket for the triple clamp nut, away we went. It actually went reasonably well; after drilling a hole in the right clip-on bar to accommodate the pin in the throttle housing it all went back together, with the new clip-ons mounted below the triple clamp. I refitted the fairing a bit lower down and the look was not perfect, but was much improved. But the fairing was still very wobbly without a top bracket.

The plan was to pick up a bracket or make one, and restore the fairing to its original shape. I bought a suitable windscreen off eBay and planned to fit it, make a template showing what fiberglass needed to be grafted on, get a boat shop to do the 'glass work, then fit it back up and design a bracket... that's lots of work and time, (and money).

However, looking at a Hawk GT Facebook group, I spotted a used Two Brothers Racing fairing, windscreen, mounting bracket, headlight unit, paperwork, clip-ons, and braided brake line for sale in Winston-Salem, South Carolina. The price had started at $800 but reduced over time to $400... I offered $300 plus shipping and a deal was made. Score! And after a brief scare where I thought the seller was backing out to sell the parts along with the Hawk GT they came with (the prospective bike buyer ended up flaking on him) the parts eventually landed in Pembina ND.

The following weekend I whipped down to Pembina and brought back a giant box. The next morning I set to work fitting it. Wow what a difference, so much better than even the repositioned chopped up fairing. The bike was really starting to look like the classic RC31 I love so much, and riding around the block confirmed that the new bracket had the fairing mounted rock-solidly on the Hawk frame.    

Now I have a parti-coloured wonder... yellow upper fairing with white/red/blue tank and seat unit, and blue/black seat. However the next order of business will be to get the wheels refinished and new Dunlop Sportmax GPR-300 tires fitted. This will take some doing as the shop where the tires will get fitted and the powdercoater who will do the work are on opposite sides of the city. But never mind, we'll get it done. Bike-It F1 mirrors (same as on the old Hawk) have just arrived from the UK and will be fitted so I can ride the bike around a bit. Next thing after that will be to decide on a colour scheme and get the bike painted - this will likely happen over the winter if I'm honest. Too much going on in the summer!  

In the meantime here are some potential colour schemes:

On an RC30

On a Hawk GT


R/W/B scheme on the TBR Pro Twins Modified Race Hawk

Another TBR race bike

Yellow option - HB Cigs Honda GP Bike

Thanks for reading and please stay tuned (if you're interested) to see how things progress!


Wednesday, August 24, 2022

New Garage Resident - 2003 Buell Firebolt XB9R

So there's a bit of a story behind this one - I'd planned a trip with some friends to ride motorcycles in the southern Rocky Mountains. The thing is, the jump-off point for the trip is 1,300km away from me, and I didn't really feel like riding the R1 across the Prairies to Calgary, riding around the mountains for five days, and then riding all the way back. But I had a space in the garage after selling the 848 last year, so obviously the thing to do was to buy a bike out west, fly out there, ride it on the trip, and ride it home. Sorted!
 
So I asked my buddy Marc in Okotoks to keep an eye on kijiji for an interesting machine for not much money. A couple days later he got back to me with this Buell. After an in-person inspection by Marc the deal was made, and he took the bike back to Okotoks to his garage/shop. He very kindly put on a new tire, changed the oil and filter, replaced brake pads and bled the brakes - basically a full service. Thanks man!

It was up to me to buy some parts to return the bike to stock. Some previous owner had replaced the perfectly stylish stock turn signals with hideous LED crapbuckets. Sourcing replacements was a challenge - DO NOT BELIEVE TWIN MOTORCYCLES OR OTHER ONLINE VENDORS THAT SAY THEY HAVE REPLICA STOCK BUELL SIGNALS. They don't work - the stock units have a threaded post, the "replicas" don't - they attach with a small screw. This can be made to work on the rear, but not the front - the front signals' threaded posts double as fairing mounts. So the lesson is, buy signals from a Buell Blast! as they will work fine. Expensive, but worth it for the superior stock look.
  
Of course one of the appeals of the Buell is the absolutely wacko engineering that went into the bike. What looks like a fuel tank is actually just a plastic cover for the airbox - the frame holds 14 litres of fuel.

Crazy front brake - "Zero Torsional Load" disc attached to the wheel rim, with six-piston caliper. Great stopping power once the pads were replaced. Advantages (according to Buell) are dispensing with the weight and complexity of a dual-disc setup, and supposedly transmitting brake loads directly through the wheel rim, enabling a lighter wheel. Male-slider adjustable fork is arranged at a 21 degree angle (!)
 
Furthering Buell's "mass-centralization" obsession is the oil tank for the dry sump engine, mounted in the swingarm.

Beefy alloy frame and swingarm eh? Made by Verlicchi and Brembo (respectively) in Italy, apparently. The whole bike is super-compact with a wheelbase of only 52 inches.

Hmmm... not a huge fan of the font Buell used on the instruments. Looks pretty amateur-hour. Small digital display has two trip odometers, the regular odo, and a clock.

Logo on the top triple clamp is classy though.

Engine visible here - it's a fuel-injected 45-degree aircooled 984cc v-twin loosely based on a Harley-Davidson powerplant, but with many features specific to Buell. It's backed with a five-speed transmission and is cooled by a loud fan that comes on after you shut off the engine. The exhaust muffler is another feature of mass-centralization, placed below the engine. The exhaust note is very Harley-like, not something you'd necessarily expect from a bike that looks like this.

See what I mean? The stock signals are quite lovely, not sure why anyone would replace them. In fact I remember back in the day, people used to recommend Buell signals for bikes like my old Honda Hawk GT. Maybe that's why they're so hard to find nowadays!

What's it like to ride? Well, I feel like I can speak with some authority on that after riding it something like 2,700km in the last 9 days, about 1,400km in five days in the mountains, and 1,300km in two days on the Trans-Canada Highway from Calgary to Winnipeg. 

I found the bike really easy to ride on twisty mountain roads. Power delivery is pretty linear but there's not a ton of it - the engine is rated at 92hp at the crank. Fortunately the bike is pretty light, so as long as the road is twisty, rapid progress can be made. For me the bike handled great, very nimble but will hold pretty much any line you want in a corner. Fuel economy in the mountains was outstanding, easily exceeding the 120-mile range reported in road tests at the time. I got 250km out of 9.2 litres at one point. But economy ebbed once on the Trans-Canada Highway. On my last tank I only got 200km before the low-fuel light came on.

While the bike felt great on the mountain twisties, the tight wheelbase and high footpegs grew uncomfortable on the long straight highway home. I was able to last about 100 miles at a time at most. The bike had ample power to cruise above the speed limit, but it's not a mile-eater like the R1. 

So will it hang around long-term? Hard to say. It's reinforced my love for low-revving big twins, that's for sure. But its air-cooled nature means it gets hot on warm days and the five-speed is clunky. But it handles great and it's certainly different - and I think I'll keep it around for a little bit at least.

One last thing - some promo materials I picked up!


"Deeley's House of Buell" was Canada's west-coast Buell dealer, associated with the famous Deeley Harley-Davidson franchise. Can you believe that MSRP though? Fifteen-and-a-half grand for this bike in 2003, it boggles the mind, especially considering Canadian MSRP for a 2003 Yamaha R1 was apparently $14,999. Buell was definitely positioned as a premium-price brand.

Thanks for reading! 

Sunday, October 31, 2021

2018 Audi S3 Beauty Shots and Random Thoughts

As I'm coming up on a year with the S3, I thought I'd better take some pics with the summer wheels before I have to change back to the winter setup. I really like the stock 19"x8" double 5-spoke Audi wheels. I'll add some thoughts about the first year with the car near the end of this post.

Still on the stock Pirelli tires that really aren't showing much sign of wear.

Love the stubby styling of this car, the overhangs are so short.

Nice little decklid lip spoiler. I can see the appeal of a larger carbon version.

FFS - nice shot but some numpty left the filler lid open!


I attached the dealer plate frame with zipties - I think it looks pretty good, and beats the $400+ factory plateholder I priced out at the dealership.

Thoughts after a year with the car? Well, while I can tolerate the Audi dual-clutch transmission, I'd still rather have a six-speed manual. Not sure why this isn't possible - Audi offer a third pedal option in the Golf R, this car's fraternal twin. In any case I don't use the flappy paddles much at all, and the Sport mode is OK but not super-engaging. Fortunately the car is so quick you don't notice the gearbox much, except when just cruising along sedately. Unfortunately in those cases the gearbox seems to want to shift up ASAP and if you ask for power there's a delay as the gearbox shifts down. Sport mode cures this somewhat but keeps the revs high at cruise - perhaps this is the only alternative.

The only other minor niggle I have has to do with the ICE system. My old 2015 Volkswagen GTI had a touchscreen interface which was great - but for whatever reason Audi went for a scrollwheel-controlled system in the S3. This is quite a bit less intuitive. I do quite like the Virtual Cockpit but haven't reconfigured it much at all - I keep the speedo and tach in the middle and real-time fuel economy on the left. I should really play with that a bit more. Maybe if I ever take a road trip I'll try out the mapscreen. Apple CarPlay has been a bit troublesome as well, it just kinda stopped working one day. After a fashion I had to fiddle with the phone and the MMI and it seems to be on track now.

Other than those small things I still love the car. The styling really appeals to me and the colour still gets lots of compliments from random passersby. Maybe a tune is in the future - I like the idea of ~350hp and a sharpened DSG experience for about a grand. We'll see. 

Thursday, October 28, 2021

Yamaha R1 with Micron Slip-On Exhaust Sound Clip


So when I bought my R1 many years ago, it came with both the stock exhaust and a Micron carbon slip-on . I immediately removed the Micron and stuck the stock pipe back on, and have ridden the bike for years like that. However, I recently took a notion to re-fit the Micron for some more funky sound. It only took a few minutes and I didn't even have to remove the fairing lowers, although I did order a couple of springs for the muffler. 

The sound isn't obnoxious at all and I don't mind the look - although I prefer a round can to the oval one, the carbon fiber is nice and certainly waaaay more tasteful than the multi-coloured tat that people used to fit to their sportbikes in the late '90s. It's also a "period-correct" modification, unlike the stubby cans and bottom-exit exhausts that currently seem in vogue. An Akrapovic would be better but they're NLA now and to find a second-hand one in good shape is practically impossible, so I'll stick with this one. 

It's much lighter than the stock exhaust as well!

Saturday, July 24, 2021

Motolectric Battery and Starter Cables for the Ducati 900SS/SP - Review and Installation Notes

Starting up the 900SS/SP has always been a bit of a "will it or won't it" proposition. The starter churns the big pistons over soooo slooooowly and it's a toss-up whether the thing will fire before the battery runs out of juice. This is not to mention the frequent occurrence of a literally smoking-hot positive battery cable (!). 


After 15 years of ownership and probably five or six new batteries I finally decided to do something to address this issue. I'd long been aware of the upgraded wiring kits offered by Motolectric and others, and I decided to take the plunge and upgrade. Of course I ordered the kit for my 900SS/SP from Motolectric in the morning, and later the same day went to start the bike. As I touched the starter button I heard a tremendous BANG and saw smoke come out from under the fuel tank... the battery had exploded, sending lead acid and bits of Yuasa casing flying everywhere. Fortunately the acid damage to the bike was limited to just a few spots on the frame paint, but this underlined the urgency to Do Something about the wiring situation.

About ten days later the Motolectric kit arrived from California. It is comprehensive, containing beefy cables to replace the stock ones that run from the negative battery post to ground, from the positive battery post to the starter relay, and from the starter relay to the starter. The kit also includes rubber terminal boots, a pair of latex gloves, a microfibre towel, some cleaning supplies, and many zipties to ease installation. There are no instructions included, but general instructions are posted on the Motolectric website. These were frankly insufficient for the 900SS/SP installation but proprietor Michael Heth was very generous with his time in responding quickly and clearly to my emailed questions.

Here's some of the wisdom he imparted as well as my own experience in installing the kit, assisted in no small part by my good friend Andy.

NEGATIVE (GROUND) BATTERY CABLE: the new cable is NOT installed directly in place of the old cable, which runs from the left-hand (negative) terminal of the battery to a grounding stud on the upper left side of the frame. Instead, it runs across the centre of the bike to the right side, and behind the cam belt cover through a gap between the cover and the vertical cylinder, and down to ground directly on the engine near the breather. You can tell where the ground is because another grounding wire comes out of the frame and is secured to the ground. It was a bit of a faff to get the thick cable through the gap behind the cam cover, but I did it using a ziptie to "extend" the cable give something to grab onto to get it through the tight spot. Use the supplied bolt in replacement for the stock grounding bolt, and be sure to place the new cable end lowermost (next to the engine casing) when retightening.

Ground bolt on engine case (centre left)

New ground wire connected

POSITIVE BATTERY CABLE TO STARTER RELAY: Contrary to what it says on the website, this one does require cutting of the stock wiring. The Motolectric cable contains a pigtail with a yellow screw-type wire connector. The stock wiring consists of a cable connected to the positive terminal of the battery that itself connects to a box mounted on a flat metal piece. The box unites two smaller boxes: one containing the wire that runs to the starter relay and the other with two red wires that go elsewhere. Take the box apart by pressing the plastic connector levers, and cut the two red wires, stripping the insulation down about half an inch from the ends. Put the ends into the detachable half of the yellow screw-type wire connector in the new cable pigtail, and screw the connector together, sealing the connector with the supplied heat-shrink wrap.

Photo: Motolectric

STARTER RELAY: This was the trickiest part of the install as it involved some delicate work around a VERY hot engine. First, get in there and disconnect the white plug from the relay and then dismount the relay from its metal mounting. Just work the rubber sleeve off the mounting and then take it off the relay. Once this is done the relay has a lot of room to move and is much easier to access. Remove the boot from the positive input side, remove the bolt and the old cable, and attach the positive battery cable there. Do the same with the other side - attach the new cable that goes to the starter. We had to cut the "lips" off the new boots to allow the white plug to reseat properly. Then put the relay back in the rubber sleeve and reinstall on the metal mount.

STARTER RELAY TO STARTER: be mindful of where the stock cable runs and cut the zipties securing it to the frame. Run the new cable along the same path. You may have difficulties unscrewing the nut from the threaded post on the starter where you attach the cable coming from the relay. It is down below the engine and directly in the path of road muck. The one on my bike was so crusty it was nearly unrecognizable. Still, once some penetrant was applied the super hot engine helped it work. It's a 9mm nut but was starting to round, so we pounded on an 11/32" socket and hey presto, it came off. I was warned to be careful to secure the post with a thin wrench lest it rotate and twist up the wires inside the starter, but this turned out not to be an issue. Attach the terminal of the cable to the post and use a new 9mm nut to fasten it up, then ziptie the loose cables back into their positions. Sorted!   

The theory behind the upgrade kit is that the stock wiring and ground routing don't enable efficient current flow, and this limits the cranking power that can get from the battery to the starter. Less cranking power means the starter has to crank longer and the battery has to work harder, wearing both components (especially the battery) prematurely. Beefing up the size and quality of the cables means current flows better, the starter cranks harder and the bike starts better. I'm optimistic that the cable upgrade will help my bike to start better, but it's hard to quantify the effect at this point as the battery is brand new and started the bike instantly anyway. Hopefully the cable upgrades will help preserve that battery capacity for seasons to come. As for the Motolectric kit, I recommend it - the cables look impressive (there is an explanation of the technology behind them on the Motolectric website) and the kit is comprehensive. As noted, the installation instructions on the website are generic and some of them were inapplicable to my bike, but Motolectric was very helpful in sorting it out. Installation took a couple hours altogether.

Cost: ~$200CAD including shipping

From: motolectric.com